Wednesday, January 23, 2013

Healthy Eggplant Parmesan


More sugar free food. I'm just so thrilled with all the savory food I've been making lately. The great thing about cooking is you don't need a recipe, unlike baking which can be more of a science.

Eggplant Parmesan was on our menu one night. I adore eggplant. I can eat babaganoush by the spoonful.  Traditional eggplant Parmesan is terribly unhealthy with white bread crumb coating, then probably fried in vegetable oil, topped with tomato sauce that may contain sugar (yes lots of tomato sauces have sugar), and smothered in bad cheese....

Luckily it can be made healthy! Bread it with grain free healthy ingredients, use organic sugar free tomato sauce, and top it with organic raw cheese and you've got a crazy delicious yet healthy meal.


Eggplant Parmesan

1 eggplant
Himalayan salt

Slice thick rounds of eggplant with it's skin on.
Add the slices to a large bowl of water and sprinkle a spoonful of salt on top. Stir it all together with your hands and push the eggplant under the water. Set aside while making the breading. Soaking in the salt water will draw the bitterness out of the eggplant - watch the watch change colour.
After about 10 minutes drain the water off, rinse, and squeeze each piece to let excess water out.
---------
Grain Free Breading

1/2 cup almond flour
1/4 cup Coconut flour
1/8 teaspoon Himalayan salt
----
1/4 cup coconut flour
2 eggs, whisked
----
Coconut oil, heated in a pan when ready to cook 
Tomato sauce, heated
Cheese of choice, grated (I like raw cheddar)

Preheat oven to 350F.
Toss together the almond, coconut flour, and salt in a large bowl.
In a zip lock bag toss the eggplant with the 1/4 cup coconut flour to coat it.
Use tongs to dip the eggplant slices into the eggs and then into the breading mixture making sure to coat all parts.
Add the coated slices to the heated coconut oil and fry on each side until golden, then transfer to a baking sheet and place in the oven for 10-12 minutes or until the eggplant is fully cooked through (fork will pierce through easily).
When cooked, ladle hot tomato sauce on top and sprinkle with grated cheese (it will start melting quickly).

Still on an eggplant kick, I made a pan of roasted eggplant, red and yellow bell peppers, garlic, and onion, tossed with fresh parsley after roasting. These were a great accompaniment to salads or as a side dish.

I made a big pot of chicken stock from a chicken we got locally. I love that we can use the entire chicken. I used the meat for chicken with mushroom gravy and cauliflower mashed potatoes one night, J got chicken sandwiches for work, we froze a bunch, and I made paleo chicken pot pie (more on that later). And of course the bones provided this nourishing broth!


Shared at Slightly Indulgent Tuesdays, Allergy Free Wednesdays

Saturday, January 19, 2013

Soup N Crackers and a Detox Update


Guess what?! I've surpassed my two week sugar detox. I did 17 days without any sugar/stimulants, and am feeling great! I'm surprised at how satisfied I feel. I haven't experienced any cravings, or headaches, or anything other than a more balanced me over the the past 16 days. From my past experiences I already know that I respond well to this plan and now it's just a case of reigning in my sweet intake (yesterday I broke the cleanse with a carob treat sweetened with stevia and a sampling of chocolate) on a regular basis because it's just too easy for me to get caught up in it. In the past I have all too easily disregarded a proper meal in favor of eating raw dessert or snacking on raw chocolate all afternoon.

During my cleanse I've seen my body/mind shift back to where it should be. My metabolism has gone up and my food digests so much better without the excess sweet stuff and cacao - despite the fact that I'm eating more than I normally do! There's no calorie counting. Just eating real food every several hours throughout the day. A shift happens very quickly on this sugar free plan. Within only a few days I feel a positive difference. At this point my body feels leaner and while I don't weigh myself, I'd estimate that I've lost about 4 lbs.

Here's why I would recommend a sugar free plan to you (for at least 5 days):

- Reset your metabolism
- Reset the part of your body and mind that craves sugar
- Begin to clean sugar and other toxins from your body
- You can eat ample amounts and never feel deprived (unlike diets/juice fasts that limit calories and can cause binge eating afterward)
- It's a great time to be creative with healthy savory recipes
- Sleep better
- Think more clearly
- Less depression/irritability if you're prone to that from too much sugar (I am)
- Feel more calm overall

A few other things to keep in mind (from what I've learned):

- You may feel tired as your body adjusts to no stimulants/sugar (I take this as a time to rest more than usual and don't do any workout for the first few days except some yoga.)
- You may possibly have withdrawl symptoms like headaches if you're used to drinking lots of coffee, sugar, etc. (Fortunately I don't experience this)
- Drinks heaps of water to flush your body out
- Even though this is a "detox", don't drop your calories too low. In my experience, this is one of the things than can cause cravings. So eat up plenty of the good stuff. Hungry? Eat!
- Eat enough protein and fat to stay satisfied. This makes a huge difference.


Onto some food! Remember the creamy cauliflower soup I made recently? I loved it so much that I also made it with broccoli and it was absolutely delicious. The recipe is the perfect creamy soup base. I want to try it with zucchini and mushrooms too one of these days. I find it so warm and nourishing on these cold snowy days. 


Creamy Broccoli Soup

This delicious creamy soup is actually dairy free. It's so smooth and rich that you'd never guess it's actually healthy and its beyond easy to make. I made it using my homemade chicken stock but you can easily use a veggie stock if you prefer a vegan option.

1 medium broccoli (florets only) roughly chopped
1 medium onion, chopped
1 clove garlic
Chicken or veggie stock
1/2 can coconut milk
Salt and pepper, to taste

Add the broccoli, onion, and garlic to a big pot.
Pour enough stock over to cover with a bit extra liquid.
Bring to a boil and simmer for about 15-20 minutes or until the veggies are cooked through.
Carefully transfer (because it will be so hot) to a blender and puree until completely smooth.
Stir or blend in the coconut milk. Season with salt and pepper. Add more stalk to thin to desired thickness.


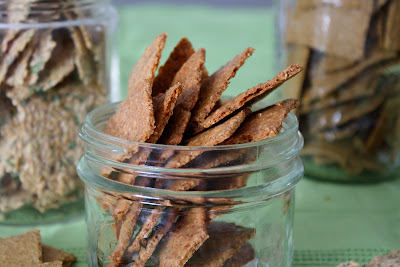
I've made so many crackers in the past two weeks. I find them to be such a great snack with avocado herb dip, or just mashed avocado, or crunched up into a salad like croutons. They also seem to compliment many meals. I plan on sharing some new recipes with you as soon as I do a little teaking on them. 

I made these delicious Nacho Cheese Chips from the Comfort Belly (although I prefer to call them crackers). I love the simplicity of these crackers and they provide the perfect flavorful crunch - all while being gluten free and grain free. 


Nacho Cheese Chip Crackers


1 cup shredded cheddar cheese (Use raw cheddar cheese. Its white, not dyed orange like regular cheddar!)

1 cup almond meal or almond flour
1/4 teaspoon sea salt
1/2 teaspoon chili powder
1/4 teaspoon chipotle powder
2-3 tablespoons water (enough to roll into a ball of dough)

Preheat oven to 350F. 

Blend the cheese and dry ingredients together in a food processor or bowl then add the water. 
Press the mixture together to shape it into a ball of dough. 
Place the dough on a non-stick surface that you can transfer to a cookie sheet. 
Flatten the dough with your hand and then place a piece of parchment paper on top (or other non-stick surface).
Use a rolling pin to flatten the dough until very thin.
Use a pizza cutter or knife to score the dough into triangles. I create squares and then I cut them diagonally across the square to create triangles.  
Sprinle some more chili powder lightly across the chips. 
Place the chips on the parchment paper onto the cookie sheet. 
Bake for 15 minutes or until they start to turn darker. 
Cool the chips for a few minutes and then flip over and bake on the other side for another 5 minutes. Cool. 
If they're not as crispy as you would like place them in the oven at 200F for 10 minutes. 


I made dehydrated raw ranch flax crackers, and raw mexican crackers that both turned out great and would love to share them with you but I need make them again and write down the measurements. I've also made some great baked vegan crackers that we've decided are out favorite so far but I need to make again and get measurements for those too. 


These were made with sunflower seeds, flax seeds, chili powder, chilpotle, himalayan salt, onion powder, and apple cider vinegar. Thin and crispy.

Bread was another dehydrated item I made last week. Raw vegan veggie bread is always a hit and J especially loves to make sammies out of it, or have a piece with his breaky. I like it slathered with avocado and slices of tomato. Everyone needs this bread in their life!


Onion Veggie Bread


1 medium zucchini, shredded
1 large carrot, shredded
2 large onions, shredded in a food processor
1/4 cup olive oil
1-2 tbs nama shoyu (or tamari)
1/2 cup water
1 cup ground flaxseed
1 cup ground sunflower seeds
1/2 teaspoon himalayan salt (added by me)

Mix together the veggies, olive oil, water, and shoyu in a bowl.
Add the seeds and mix to combine.
Spread a thick layer of the mixture evenly on teflex sheets. Score into desired sizes.
Dehydrate at 145F for 1 hour and then turn the temperature down to 115F and continue dehydrating for 6-8 hours, flipping over to the mesh screen halfway through.

I hope you're inspired to make some healthy crackers and soup! 

Monday, January 14, 2013

Tropical Christmas Part 2 and a Coconut Dessert


Last week I shared a bit of our Christmas vacation in Cuba and today I've got some more to share. We've been home for almost two weeks and I miss the beach already. Every morning we walked along the beach collecting sea shells and even found lots of conch shells which I've never found before!


Glorious skies from morning to night...


For as long as I can remember, I've wanted to see dolphins up close. I think they're such beautiful and mystical creatures. J and I got the opportunity when we booked a day long catamaran excursion.


We hopped aboard the boat and sailed into the ocean for a while before stopping to go snorkeling. I've snorkelled and seen incredible fish, coral, and starfish before so I was super stoked... however the snorkeling on this expedition was less than stellar. It was just brown coral - and no fish! What the heck!


But onwards and upwards, we then sailed to another part of the ocean to see/swim with the dolphins! They're adorable beyond words, really gentle, and very well trained.

I call this one Dolphin Love... <3

As wonderful as it was though, I have a hard time with the captivity thing. I really hope they're treated well. They did appear happy and seemed to enjoy performing for us and got lots of treats.... but at the end of the day I hope they're well taken care of.


Mira is three years old and lives with her mother, along with another mother and young one.


Everyone on the tour got to touch her several times - her back, her belly, give and receive kisses from her, give hugs, and even pick her up! She was so smooth, and when we picked her up she felt felt flexible yet incredibly strong.


J went swimming with her and I took pics. She swam on her back while he was on her belly and flew around the water.


Then they hugged and she mauled him, lol. It was like he found his best friend in the world. I absolutely love these pics.


She was super playful with him!

It was great to see the pelicans too! There were so many of them.

After that we hopped aboard again and sailed to an island with a gorgeous long white sand beach and outdoor restaurant for a lunch of fresh lobster and fish. Of course I grabbed a young coconut to sip on after lunch as we hit the beach. Since we'd been out in the sun all day I needed a little reprieve hence putting my coverup on my head.


Blue, blue, and blue...

Instead of wine, I drank champagne every day. The wonders of an all inclusive.

We enjoyed the Japanese restaurant one night which was very entertaining!

There were always such creative veggie sculptures.

The biggest pan of paella you'll probably ever see!

We enjoyed the glorious full moon one night.

Every day the pineapple and coconut guy came by on the beach. A long line of people wait for their fresh drinks! J wanted to try the pina colada while I went for a young coconut.


He removes the inside of the pineapple leaving the bottom to create a cup and the core stays in.

He gives you the pineapple to eat.

And then he makes the drink with rum, coconut, etc.

And voila! Pina colada served in a pineapple.

This time we got coconuts from one of the gardeners sells them on his break. I took every opportunity to drink fresh coconut water.


Oh, and a monkey riding a pony alongside a goat. Ever seen such a thing?! Heheh

Of course there was lots of beach yoga!


Thinking about all those fresh coconuts makes me want a coconut dessert! I dug up an easy oldie to share. I posted this last year on Sweetly Raw after my trip to Costa Rica and did a whole post dedicated to raw vegan coconut desserts. I layered this coconut whipped cream with fruit to make a simple dessert, but works great as a breakfast item too. I even like it by the spoonful. Mmm.


Coconut Whipped Cream

1 cup packed young coconut pulp
1/2 cup coconut water
1/2 cup cashews
3 tablespoons agave, maple syrup, or coconut nectar
1 tablespoon lemon juice
1 teaspoon pure vanilla extract
Pinch of salt
1/2 cup + 1 tablespoon melted coconut oil
1-2 drops stevia, if needed

Blend the coconut pulp, coconut water, cashews, maple, lemon, vanilla and salt until completely smooth and creamy.
Add the oil and blend again to incorporate.
Taste and add a few drops of stevia if you like it a bit sweeter.
Spread into a large bowl and chill in the fridge for at least 8 hours until it firms up.

On another note, I'm into day 13 of my sugar detox. Almost 2 weeks. Woo hoo! I've been cooking up a storm and it's been so much fun. I have more recipes to share this week and I hope you checked out the sauerkraut recipe and started up a batch on the weekend.

Shared at Wellness Weekend

Saturday, January 12, 2013

Homemade Sauerkraut


I absolutely love sauerkraut. I had never eaten it until about four years ago and now it's usually a regular part of my diet. I used to stock up on the large jars of Bubbies sauerkraut whenever I was in the city, but in the past few years I started making my own. Not having local access forced me to give it a shot and I'm glad I did. There's something special about making my own kraut - I think its the same feeling as growing your own food. It's rewarding to put the work in and then sit back and let the magic happen for x number of days before its ready to eat.

I finished a batch before we left for Cuba and within a few days of being home I started a new one. I especially love to eat it with my breakfast eggs and in my salads, and my favorite combo is a simple mix of green cabbage, carrot, and caraway seeds. This new batch inspired me to share the recipe on this blog even though I've already posted on Universal Eater a few years ago.


Sauerkraut

For step by step instructions with photos check out my original post HERE.

1 large green or red cabbage
2 carrots, shredded, optional
1 tablespoon himalayan salt
1 tablespoon caraway seeds, dried dill, or other herbs/spices (optional)

1. Remove the outer leaves of the cabbage and thinly slice it with a knife or in a food processor.
2. Toss the cabbage, shredded carrot, and salt together in a large bowl. The salt draws water out of the cabbage, creating a brine, and also preserves it during the fermenting process. I added caraway seeds at this point.
3. Massage the cabbage, speeding up the release of water, and/or place a plate with a weight (rock, or jar filled with water) on top until you notice the liquid. I like to massage it and then let it sit with a weight for 20- 30 minutes. A good amount of liquid should be release before moving on.
4. Add herbs/spices of your choice, and/or other veggies and toss together.
5. Spoon the mixture into glass jars and then firmly press the kraut down (I use a wooden dough press) to release all air bubbles, and to bring up liquid level. The liquid must rise above the cabbage.
6. I like to press the extra cabbage leaves on top, to hold the mixture down.
7. Screw the lids on and set the jars in a neutral temperature for a few days. Check after 3 days and then store in the fridge, or ferment for a few more days. I usually ferment an old large pickle jar for 5-7 days. It will continue to ferment as it's left out, and will stop once refrigerated.

Note: Sometimes a layer of mold will form on top of the kraut (although it's never happened to me). Apparently it's still safe after skimming this top layer off, however I did have a jar go bad once and threw it out.


Have you ever made your own kraut? If you're intimidated like I was at first, just give it a shot. What have you got to lose? A head of cabbage is cheap! (But I'm sure it'll turn out).

Shared at Wellness weekend, Healthy Vegan Fridays

Wednesday, January 9, 2013

Sugar Free Detox Food


I posted this photo of chili cheese fries on facebook and asked if anyone could guess what I made the "fries" with... they're not potatoes! Take and guess and then find out below...

I've finished a week of my sugar free cleanse and am smoothly moving into my second week. The past seven days went by so fast - there are many more tasty things I want to make but have been having fun getting more creative with my savory meals.

Here are the meals and snacks I've eaten in the past week. 

Every morning I eat the egg meal for breakfast, and the protein shake is always my second meal (I also eat these 2 meals when I'm not on this sugar detox). From there my meals vary according to what I feel like, but I eat every 2 1/2 - 3 hours. I get hungry so much faster when I go without sugar because my metabolism raises like crazy.

- 2 eggs cooked in cultured butter with spinach, raw tomato, and a dollop of avocado caesar dressing.

- Protein shake - Water/tea, plain yogurt, frozen wild blueberries, strawberries, spinach, whey protein powder.

- Salad (romaine, tomato, celery, cucumber, red pepper, avocado), meat or fish, avocado caesar or acv/olive oil dressing.

- Raw veggies and baked seed crackers with avocado dip.

- Creamy cauliflower soup with seed crackers.

- Chili - moose meat, tomatoes, peppers, zucchini, onion, garlic, carrots.

- Elk and veggie roast - elk roast, peppers, zucchini, onions, tomatoes, garlic, dried basil/oregano/ red pepper flakes/ himalayan salt/ pepper/ tarragon all in the slow cooker.

- Handful raw nuts (I keep a little baggie of these in my purse if I'm out and need something quickly).

- Veggies with sprouted almond butter.

- Chili cheese "fries" (using chili the next day).

An old example of my breaky eggs from this post. 2 eggs and kale cooked in coconut oil, with my homemade sauerkraut, tomato, and raw parmesan cheese. So good!


Some of the other things I'm doing:

- Chilled pau d'arco tea for my protein shakes. This is very cleansing for the liver so I thought it was a perfect time to use it on a regular basis. Outside of the sugar cleanse I like to make chilled reishi and chaga tea for my shakes.

- Regular skin brushing. This is something I don't do enough on a regular basis but have been making a point of doing every day in the past week before showering.

- Drink a big mug of hot water upon waking. No matter where I am in the world, I find a way to drink a big mug of hot water when I wake up. It helps to flush things out and get hydrated before eating breakfast. Sometimes I add lemon.

- Yoga. This is a huge part of my life and my mind and body requires yoga every day. It's especially helpful during a cleanse as the postures and breathing are naturally designed to detox the body and balance all areas of oneself. Twisting postures are particularly great.

- Sleep. I've been trying to go to bed earlier this past week. Some days it happens, other days it doesn't but overall I'm trying to wind down and at least get into bed earlier to read before sleeping.

In my first post I listed all the things I'm eating.  Here's a list of what I'm NOT eating:

- Sweet fruit
- Sweeteners
- Grains
- Alcohol
- Caffeine
- Cacao

Last weekend I had a twinge of wanting some wine at our friend's dinner party. Everyone else was enjoying drinks and normally I would be too. Solution? I drank sparkling water with fresh lime and a few drops of stevia in a wine glass. It's actually a drink I enjoy on hot summer days and it was totally satisfying the other night.

That brings me to another point. What if you're on a detox plan and you're going to a friend's for dinner? Simply explain what you're doing and tell them that you need to bring your own food. That's what I did and my friend understood completely, in fact she's seen me go through all my past sugar cleanses so she wasn't really surprised. Everyone enjoyed the gluten free lasagna she made while I brought the chili and salad I made. I also offered to bring an appetizer that I knew I could eat. I brought a platter of veggies, steamed broccoli, and the seed crackers I made, along with an edamame avocado dip.

Onto the chili cheese fries that you saw at the top of the post. The fries are made from cauliflower stems! It's a great way to use a whole cauliflower - the florets got used in my soup. The chili cheese fries idea comes from The Art of Healthy Eating.


Chili Cheese Fries

I topped the cauliflower fries with made my own moose meat chili recipe and melted some raw cheese on top (she uses a cheese sauce in the book). I never measure any ingredients when making chili. The great thing is that you can add a little of this and that. The tomato base and seasons are what "make it". This can easily be turned into a vegan recipe. Use a veggie chili and top with vegan cheese or cheddar sauce.

Cauliflower Fries

2 cauliflowers, whole stems removed
Olive oil
Himalayan salt and pepper

Cut the cauliflower stems into sticks.
Toss with olive oil and sprinkle of salt and pepper.
Bake at 375F for about 12 minutes. Flip and cook about 5 more minutes, or until soft and browned.

Here's an old pic of my chili where I also added beans and kale. This time I didn't add either but that's what I mean about adding whatever you want.


Chili

I find chili to be such a nurturing winter food. It's filling and warming. With a big batch you can freeze some and enjoy the rest for several meals. I like it topped with a big spoonful of plain yogurt and green onions along with a few seed crackers on the side. Turn it into a whole new meal by making the chili fries!

1 lb ground moose or beef
1-2 large cans diced tomatoes (no salt variety)
1 can tomato paste
2 teaspoons butter or coconut oil
1 onion
1-2 carrots
1-2 stalks celery
1 red bell pepper
1 yellow bell pepper
1 small zucchini
2 cloves garlic, chopped
Chili powder, cumin, red chili flakes, himalayan salt, to taste
1 can beans of choice, optional (rinsed well)

Cook the meat in a large pot. Don't overcook as you'll be simmering it later. Transfer to a bowl.
Heat the butter in the same pot, and fry the onion until translucent. Add the celery and carrot and cook for a few minutes.
Add the remaining veggies, including the garlic and spices (add lots of chili powder, less cumin, and only a little chili flakes if you don't like much heat).
Stir for a few minutes making sure all veggies are lightly coated in the butter or oil.
Add the diced tomatoes (depending on how tomatoey or thick/thin you like it) and tomato paste. Stir.
Add the meat back in along with the beans (if using).
Bring to a boil and then simmer for at least an hour, or until veggies are cooked through. The longer it simmers the better it will taste. I like to simmer mine for a few hours on low or let it sit in the crock pot for a few hours.


This was such a yummy dinner! I hope you'll try it too. I promise that you won't miss the potatoes and that cauliflower will become your new best friend.

Shared at Allergy Free Wednesdays, Slightly Indulgent Tuesdays