Friday, December 14, 2012

Spinach and Artichoke Dip with Goat Cheese


Tis the season... to enjoy lots of finger foods, right?! But unfortunately its usually unhealthy. When I was a child I enjoyed the spinach and artichoke dip often served in a pumpernickel bowl at holiday parties. But for many years I never touched such a dip. Now that my diet is much more open, I thought I'd re-create a healthy version this yummy appetizer.

Spinach and Artichoke Dip

This dip is great served both hot or cold. Enjoy with veggies, flax crackers, and/or rice chips.

1/2 cup packed, thawed frozen spinach (squeeze water out well)
1 cup chopped artichoke hearts
1/3 cup plain greek yogurt
1/4 cup goat cheese
1/4 cup crumbled feta cheese, plus extra for the top
1/4 teaspoon onion powder
Sea salt and pepper, to taste

In a bowl stir all ingredients together until well combined.
Spoon into a heat proof bowl and sprinkle with extra feta (optional).
Bake at 350F for about 20- 25 minutes, or until warm through.


Remember, if you want to make delicious healthy raw vegan chocolate treats, download a copy of my Raw Chocolate Dream eBook today!


Raw orange chocolate cashew goji clusters make an excellent Christmas gift!

I hope you're enjoying a wonderful holiday season!  What yummy things are you making?

Friday, December 7, 2012

Gluten Free Brownies (Grain Free Too!)


Last week I had a strong urge to make the perfect gluten free brownie. I felt like making it grain free too. I grew up eating my mom's "made from scratch" chocolate brownies. They were dense, rich, chocolatey, and moist - the perfect brownie in my opinion. I wanted something that resembled hers.


Looking at her recipe for inspiration, I realized that I could just make some adjustments to create a gluten free/grain free/refined sugar free brownie! And actually I made these twice to get them just right. I played around with amount of cocoa powder, sweetener, and cultured butter vs. coconut oil. I also tried them with two different frostings - because let's be real - a brownie needs rich chocolate frosting to go with it.


Gluten Free Brownies

I also made these with half butter and half coconut oil. There was a texture difference but was still great.

1/2 cup almond flour
1/3 cup cocoa powder
1/4 teaspoon baking powder
1/8 teaspoon sea salt
3/4 cup coconut sugar
1/2 cup butter, melted*
2 eggs
1/2 teaspoon vanilla
1/3 cup chopped walnuts
1/4 cup dark chocolate chips

Preheat oven to 350F.
In a bowl whisk together the flour, cocoa, baking powder and salt.
In a separate bowl beat the coconut sugar and melted butter. Add the eggs and vanilla and whisk again.
Add the dry mixture to the wet and beat until combined.
Fold in the walnuts and chocolate chips.
Pour into a greased 8x8" pan. Bake for 20 minutes.
Cool before adding frosting.

*unsalted


Chocolate Frosting

5 tablespoon maple syrup
5 tablespoons cacao powder
2 tablespoons cashew butter
3 tablespoons coconut butter
2 tablespoons melted coconut oil
1/2 teaspoon vanilla

Whisk together the maple and cacao powder.
Add the remaining ingredients and whisk until combined. If the mixture starts to firm up before you're ready to frost, place the bowl over another bowl of hot water.
Frost cooled brownies and sprinkle with chopped walnuts or pecans (if desired).

Still on a chocolate note, my Sweetly Raw vegan chocolates are available to order for the holidays! Check out my post for more details.


Caramel pecan choccie clusters are perfect stocking stuffers! ;)

Or if you want to make your own delicious raw chocolates for Christmas, download a copy of my Raw Chocolate Dream eBook!


Shared at Slightly Indulgent Tuesday, Allergy Free wednesdays

Tuesday, December 4, 2012

Burgers with Gluten Free Buns and Cocktail Party Food


I've never been a burger gal at any point in my life - veggie burgers and even raw burgers have always been just OK in my opinion, but this burger changed it all. It was definitely the whole package that sealed the deal for me. We ate them with a side of baked sweet potato fries and chipotle maple mustard dipping sauce. Oh my goodness! Yum.


This tasty dinner idea came to be after I stocked up on some ground elk meat at the local farmers market. A few days later while having dinner with my friend Marcy, she raved about these gluten free buns her mom has been making lately. Her, her hubby, and her mom all went gluten free a while ago and they are always trying new recipes. As she went on describing them I just knew I had to try them too. She gave me the link to the recipe on a wonderful blog I'd never heard of before. Maria's Nutritious and Delicious Journal has lots of great recipes and ideas. I've only just started browsing but there's lots to see! Anyway, here's the recipe for her bread. The healthiest gluten free bread I've ever come across that is a good replica of regular bread.

A few notes about the bread first:

Make sure to follow the instructions exactly. Make sure to powder the psyllium and measure out the powdered amount. Must be egg whites as she says people were having problems with the yolks.
I formed it into 5 large buns for the burgers and they puffed waaay up! As you can see in my pics, they look like giant buns but actually, the tops were all hollow despite following the recipe to a T. Not like the ones she pictured and a lot of people have had the same result as myself. A lot of people also had problems with the recipe in general as seen in the comments section.
I'll be trying it again but will not blend quite as long as I think that's what caused the hollow bread. Will post about it again if I do!


"HEALTHIFIED" SUB

1 1/4 cup blanched almond flour

5 TBS psyllium husk powder (no substitutes) 
2 tsp baking powder
1 tsp Celtic sea salt
3 egg whites (My eggs are medium sized on average)
1 cup BOILING water (or MARINARA - for more Tomato Basil Bread!)

Preheat the oven to 350 degrees F (I have a convection oven so for non-convection use 375 degrees F). In a medium sized bowl, combine the flour, psyllium powder (no substitutes: flaxseed meal won't work), baking powder and salt. Mix until dry ingredients are well combined.  Add in the eggs and mix until a thick dough. Add boiling water or marinara into the bowl. Mix until well combined and dough firms up.
Form into 4 to 5 mini subs (the dough will rise about 2 to 3 times so I start mine as a 1 inch disk) or one large sub/loaf and place onto a greased baking sheet. Bake for 65 minutes. Remove from the oven and allow the bread cool completely.  Cut open with a serrated
 knife. Fill with desired fillings. Makes 5 servings. OPTION: Double the batch and bake in a small bread pan to make a PANINI!


Now onto a delicious savory appetizer that is perfect for the holiday season!

These cheddar salsa stuffed cocktail tomatoes are a healthy alternative to the possibly unhealthy food you may encounter at parties (or maybe you're lucky and go to parties that have lots of clean food). Either way, I think these are a nice snacky addition to a party, or even great while watching a Christmas movie. And of course you can have a cocktail in one hand and a stuffed tomato or cucumber in the other!

You can check out my guest post recipe HERE at Cara's Cocktail Party. You'll find all kind of amazing healthy holiday food ideas there!


Shared at Allergy Free Wednesdays

Wednesday, November 28, 2012

Yoga DVD I Love


As I mentioned in my first post on this blog, I plan on doing lots of yoga dvd reviews. All the videos you'll see on here are ones that I've owned for years and really enjoy. I've tried lots of different videos - some are great, some are ok, and some weren't worth my money. You know what I'm talking about.

Shiva Rea is a well known name in the world of yoga. I find her presence soft, soothing, meditative, and yet strong. I notice myself really going inward even in her challenging series.

One of Shiva's dvds that I love is Yoga Shakti. There are lots of great things about it...


The unique "yoga matrix" allows a person to customize their own practice. This means you can pick and choose what segments you do and in what order you do them. You can make it super challenging if you're feeling particularly strong, or you can tone it down if you need a softer practice.

The dvd is suited to all levels, but I wouldn't recommend it to a complete beginner. I feel you need some basic yoga skills to feel really comfortable with this series because some of the flows are quite quick, and in general she doesn't take much time to go over alignments.

The setting is beautiful, and I'm big on visuals so yes this does matter to me. She's set on a beach in the Maldives and it feels soothing to me to see the water and the beach and sky along with her voice.

I generally like start with one of the breathing segments, followed by a few of the fast flows to get my body warm, and then I enjoy the shoulder opener segment or a few of the other stretching ones. I like a few arm balances in there too, and sometimes I choose the meditation. I always go for savasana at the end. This way I feel like I'm getting a balanced yoga practice.

This is the right dvd for you if you want to challenge yourself with her offered arm balances and things like shoulder stand and plow. When I first got the video years ago, I had to stop it several times while trying to learn the arm balances because it was a bit fast, and I got discouraged at first. So I recommend having the remote nearby, or maybe even go back to the arm balances after doing a regular practice. Then you're not interrupting your flow.

Now I can do arm balances easily! On that note, is anyone interested in learning how to do arm balances? It's something I really love to challenge myself with and would be fun to share one of these days if there's some interest. Maybe I could do some videos on it....


Anyway, I highly recommend this fabulous dvd if you're looking for variety, a workout, and a challenge.

Monday, November 26, 2012

Raw Taco Salad and Chili Con Corn


As I've said many times before, I'm always waaaay behind in posting recipes. There just isn't enough time... but I like to think its better late than never.


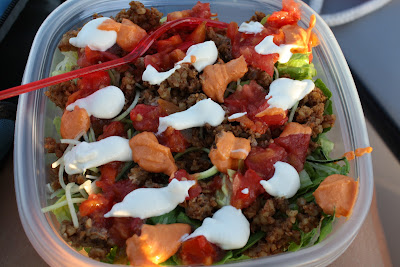
In the summer (that feels soooo long ago), I made raw taco salad several times. It's a dish that always satisfies, in my opinion. It's full in taste and filling while still being light. I've made this salad many times over the years and have enjoyed it at raw restaurants. I like seeing the different ways that people make it.

J and I got into a habit of taking our dinner out in the boat when time and weather permitted. We'd enjoy our meal and then he'd fish from the boat while I would read or take photos. Then we'd sit and watch the sunset. Spectacular.


Taco salad is so easy to throw together as long as you have the ingredients on hand. Chopped romaine, fresh salsa, guacamole, nut meat, cheddar cheese sauce, and sour cream. I don't always make everything... sometimes I omit the sour cream or guac. Pick and choose what you like.


Taco Salad
Raw *Vegan

Walnut Meat

Here's how I make walnut meat but I don't normally measure, I go by taste. Make sure to taste as you go along to make sure it's how you like it.

4 sundried tomatoes, soaked for a few hours
2 cups walnuts
2 teaspoons cumin
1 teaspoon coriander
3 tablespoons tamari

Process the drained sundried tomatoes in a food processor (or finely chop them with a knife).
Add the walnuts and spices to the processor and grind into crumbs. NOTE: Don't over process!!
Transfer to a bowl and stir in the tamari.

Sour Cream #1

A tried and true cashew sour cream. It tastes exactly like the "real" thing!

1 cup cashews
1/3 - 1/2 cup water
3 tablespoons lemon juice
2 teaspoons apple cider vinegar
1 teaspoon onion powder
1/2 - 3/4 teaspoon sea salt

Blend all ingredients in a high speed blender until smooth. Adjust salt. Chill.


Sour Cream #2

I love making this sour cream when I have young coconut. I also like to use half apple cider vinegar, half lemon juice. Play around. 

3/4 cup raw cashews
3/4 cup young coconut pulp
1/2 cup water
2- 3 tablespoons lemon juice
1/4 - 1/2 teaspoon himalayan or sea salt

Blend all ingredients until smooth and creamy in a high speed blender. 
Chill for a few hours. 

Salsa

This is an easy recipe that I never measure. It's easy to adapt it to your own taste. Sometimes I add red onion, sometimes I add jalapeno. Lemon or lime juice depending on my mood... lots of options! Simply chop the ingredients in a food processor, season, taste, and reseason. Voila!

Tomatoes, bell peppers, cilantro, jalapeno pepper (optional), himalayan salt, lemon juice. 

Cheddar Sauce

The famous raw cheezy sauce. Great on fajitas and as a veggie/cracker dip. 

1 large red bell pepper
2-3 tablespoons water
1 cup cashews
3 tablespoons nutritional yeast
1 tablespoon tahini
2 teaspoon onion powder
1 1/4 teaspoon sea salt
1 large clove garlic
2 tablespoons lemon juice

Blend all ingredients until smooth and creamy. Chill.


This yummy recipe comes from Diana Stobo. The recipe caught my attention in the summer and I decided to make it as a light dinner with flax crackers. It's really delicious and even better the next day when the flavors have a chance to mingle.

Chili Con Corn

2 cups tomatoes, diced
1 stalk celery, finely diced
1 cup red bell pepper, finely diced
1 tablespoon shallot, minced
1 serrano chili, minced
1 1/2 teaspoon chili powder
1 teaspoon cumin powder
½ teaspoon onion powder
¾ teaspoon sea salt

Place all ingredients in a medium sized bowl and mix together. Set aside

1 corn on the cob, kernels removed
1 tablespoon olive oil
1 teaspoon nama shoyu
½ teaspoon onion powder
½ teaspoon coriander
½ teaspoon cumin
¼ teaspoon sea salt
¼ cup sunflower seeds, ground in nut and spice grinder or coffee grinder

Place corn kernels in separate bowl, moisten with olive oil and nama shoyu, sprinkle spices salt and sunflower seeds on top and toss to coat. Add to the tomato mixture and fold in lightly. Remove about ¼ of the chili mixture and place in a blender. Blend to a puree and pour back into chili mixture. Fold in gently and serve.


And in case you missed it, I've just launched my seventh dessert recipe ebook, Raw Chocolate Dream. It features a collection of my favorite healthy raw vegan chocolate recipes. Click HERE to check it out and download your copy now. 


Tuesday, November 20, 2012

Healthy Holiday Pumpkin Pies


Last month I made several kinds of delicious pumpkin pies/cakes for Canadian Thanksgiving. This was the first in many years that I've eaten "real" pumpkin pie. A healthy one though. A gluten free, refined sugar free, and dairy free version of a classic pie that I'm sharing with you today. I also made a raw vegan pumpkin pie which I posted on Sweetly Raw HERE (and where you can find lots of other raw and/or vegan pumpkin recipes).

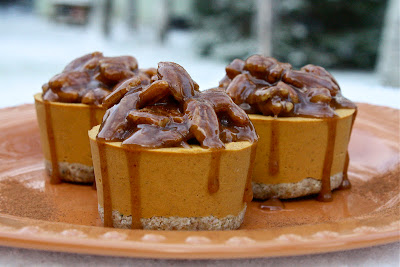
To recap, I made a completely nut free no-bake vegan pumpkin cheesecake on this blog after getting lots of requests for a nut free dessert. I made this cheesecake three times just to get it perfect to my taste and because I love it so much. In fact, I'm going to make it a fourth time today because I haven't had anything pumpkin in a few weeks, lol.


Here I made the vegan no-bake pumpkin cheesecake on an almond coconut crust and topped it raw caramel sauce and pecans.

Since I didn't get a chance to post my pumpkin pie during our holiday I thought it would be perfect to post now for American Thanksgiving. Of course a big dollop of whipped cream goes perfectly on top, or serve it with a scoop of raw vanilla ice cream on the side (or both ;).


Pumpkin Pie
Dairy Free - Gluten Free- Refined Sugar Free

Crust

For the crust I chose this delicious recipe by Gluten Free Goddess that I made two years ago for thanksgiving.

1 cup flaked unsweetened organic coconut
1 cup pecan pieces
1/2 cup all purpose gluten-free flour blend
1/2 cup coconut sugar or organic light brown sugar
2 teaspoons ground cinnamon
5 tablespoons vegan or regular butter (Earth Balance)


Place all of the dry ingredients into a food processor bowl and pulse until the mixture looks like coarse sand. Add in the vegan butter and pulse several times in short bursts until the crumbs are moist and begin to fall away from the sides of the bowl.
Dump the crumbs into 9" pie place and spread evenly in the bottom and up the sides using your fingers.
Bake in a preheated 350F oven for about 7 minutes- to set. 
Set aside. 

Filling

I love how this pie filling turned out. I would enjoy it baked without a crust too! Adjust the spices to suit your taste. 

15 oz can pumpkin puree
1 1/4 cup full fat coconut milk 
3 eggs
3/4 cup coconut sugar
1 1/2 teaspoons cinnamon
1 teaspoon pumpkin pie spice, or to taste

Beat or whisk together all ingredients until smooth. Taste, add more spices to your liking (tasting a touch of raw egg won't kill you).
Pour into the baked pie crust. Return to the oven and bake at 350F for 45-60 minutes (the edges will be brown and firm but the center should still be jiggly). 
Cool before eating.


Serve the cooled pie with a generous dollop of whipped cream (multiple recipes here) or raw vanilla ice cream.


I hope you'll try this baked pumpkin pie or the no bake vegan pumpkin cheesecake (nut free version in this blog post).


Happy almost Thanksgiving to my American friends! 


Sunday, November 18, 2012

Thai Noodles and Veggies in Peanut Sauce - For Any Diet


I have a delicious dinner recipe to share with you today. I made thai noodles in peanut sauce the other night for dinner and we loved it. Whenever I make a special meal like this I think to myself "why don't I make this more often?!" Does that happen to you? The thing is, it's easy! I just need to make sure to pick up a few extra ingredients that I don't always have on hand like lime, fresh ginger, and the rice noodles for J. I've made this sauce many times before for chicken satay (J's fave) and I love it with veggies, but I'd never combined it into a full meal before.


The great thing about this dish is that it can be made to accommodate any diet. 

Simply toss together some noodles, protein, and veggies of your choice with the peanut sauce. Sprinkle with fresh mint, basil, and/or cilantro. The fresh herbs sprinkled on top at the end make the dish even more flavourful!

Noodles: I made it with zucchini noodles for myself, and with broad rice noodles for J. You could also use raw kelp noodles, soba noodles, or linguine.

Protein: I added chicken to J's, fish (that he caught) to mine, and you could add tofu or tempeh if you want a vegan/vegetarian option, or omit the protein completely.

Veggies: I sauteed up broccoli, carrots, snow peas, celery, red pepper, and green onion - but you can definitely make this a raw meal by using raw veggies. I used to only do that. Let them sit in the sauce for a while to soften slightly and soak up the flavour.

Sauce: This is a peanut sauce but since many people don't eat peanuts, you can easily make it with almond butter and it'll be just as great. I enjoy it that way too.


Peanut Sauce

Play around with my basic recipe and adapt it to your liking. Use less coconut milk if you like it thicker and compensate with less tamari. I like it gingery but you can use less, and spice it up as much as you want with the red pepper flakes. I'm a wimp when it comes to spicy food so I only add enough to make it a tad spicy and J adds extra to his.

1/2 cup peanut butter
1/2 cup cup full fat coconut milk
4 tablespoons lime juice
1 large clove garlic
1-2" chunk ginger, chopped
4-5 tablespoons tamari
1/4 teaspoon red pepper flakes, or to taste

Combine all ingredients in a blender until smooth and creamy, OR whisk all ingredients together in a bowl (grate garlic and ginger on a microplane first if you go the bowl route.

Look at this cute furry friend that's been coming to our place lately on a regular basis?

Do you know what it is?...

It's a martin! - trying to see how it can get the suet that we put out for the birds. 

And then the martin chilled out here for a long while, sitting and eating suet. 


Check out the big pike fish J caught! First cast with his fishing rod in the lake. Yup, that's what's in my bowl above.

Shared at Slightly Indulgent Tuesday

Tuesday, November 13, 2012

The Most Important Part of Yoga. The Most Important Thing for Life.


Today I'm excited to be writing my first post on anything yoga related. So many ideas have been swirling around in my head on what to write about on this topic but I thought I'd start with something simple. Don't get me wrong though, while it's basic, it's one of the things that differentiates yoga from similar forms of exercise. It's also necessary for life...

Can you guess what I'm taking about ?

Breathing!

Proper breathing is the backbone of yoga. Breath is also essential to life, for when we stop breathing we will soon die. How often do you go about your day thinking about your breath? (I don't mean bad breath and you need a mint, lol). I mean whether or not you're breathing deeply, smoothly, and rhythmically. Most of us are so caught up in our busy lives that we rarely stop to take even a few proper deep breaths. Stressful points in the day can result in shallow, chest breathing along with a racing heart - yet we aren't always aware of it. Fortunately there's a cure for that! Tuning into a few minutes of yogic breathing every day is highly beneficial.


What is a yogic breath and how is it done?

Ujjayi (Eww - jjj - I - eeee) as it's called in yoga, is a slow deep breath in and out the nose (lips closed) with a slight constriction through the back of the throat. Each breath should be heard through the throat like a hollow or ocean sound and should completely fill the belly, rib cage, and chest.

As a beginner, try with your mouth open first and slowly exhale as though you're fogging a mirror. Take an inhale the same way. Once you feel comfortable with this, bring your lips together and continue breathing this way. Imagine your breath moving down into your belly and feel it expand out slowly (release any tension from your belly - here's where it's good to soften and push your belly out as much as you can). Once your belly is full, continue breathing to fill up your rib cage. Feel it expand out on all sides and into your back.  Finally, expand your breath up into your chest. This is all done on one inhale. Pause for a second or few seconds at the top of the inhale and then slowly exhale from your chest, ribs, and belly.

This is the description I give all my new yoga students and reassure them that while it may seem strange at first, they'll get the hang of it with a bit of practice. Soon it will be second nature as they move through each yoga posture.


What is the importance/benefits of ujjayii/proper breathing?

- The physical body begins to slow down when we breath this way. You'll notice your heart rate slow right down.

- The mental body (mind) begins to slow down too. Focusing on each breath (inhale and exhale) takes your mind away from all the mental chatter that goes on all day long. This is what it is to be completely present.

- The body begins to warm up with each deep breath as it spreads down into the body, preparing for yoga asanas (postures). The breath also creates a fire in the belly helping stimulate metabolism.


So here's my challenge to you...

For the next few days, take time at least once a day (ideally three times - morning, afternoon, evening) to stop everything that you're doing, close your eyes and take three slow, deep breaths OR breath deeply for one minute. Notice how you feel after. Even if you don't notice an immediate difference (but you probably will), keep going for the next few days. Hopefully you will want to continue this small but effective practice on a daily basis as a way of slowing down no matter what is going on around you.

Do you take time every day to tune into your breath? 
Do you practice yoga or meditation on a regular basis? 

Questions? Thoughts? Leave a comment below.

Soon I'll be starting yoga dvd reviews!

Sunday, November 11, 2012

Raw Pesto Recipes


I adore fresh pesto. In the summer I make heaps of it - some to eat fresh and the rest to freeze for the coming cold months. I generally prefer a classic basil pesto but I also enjoy it made with arugula, half spinach/ basil, and even cilantro/parsley. Since pine nuts are so expensive and I've gotten rancid ones before, I opt to make pesto with walnuts but I've also made it with hemp seeds, pumpkin seeds, and almonds. There are really so many options for getting creative here.

This post was originally only going to feature my favorite pesto recipe, but in the process I ended up digging several others from the Sweetly Raw archives. I thought it would be nice to give a few options to suit different items you may have on hand.


There are so many uses for pesto. I Naturally it's amazing on pizza along with tomato sauce, cashew cheese, and toppings. I like it spread on raw crackers/breads, on tomato slices, and on my morning eggs. I like to toss it with zucchini noodles for a delicious and light dinner. Chopped tomatoes and a sprinkle of hemp seeds top it all off.

Raw Vegan Pesto

This is my easy go-to pesto recipe. I hope you enjoy it as much as I do!

2 -3 cloves garlic
3 cups well packed basil
1 cup walnuts
1/2 - 2/3 cup olive oil
2 tablespoons nutritional yeast
2 tablespoons lemon juice, or to taste
3/4 teaspoon himalayan salt, or to taste
1/4 cup sunflower seeds, optional

Finely chop the garlic in a food processor.
Add all other ingredients starting with 1/2 cup olive oil. Add the sunflower seeds if you prefer an extra thick pesto (most of the time I make it without them). Process until everything is broken down.
Store in the fridge for a few weeks or freeze for a few months.

While this raw tomato sauce isn't a pesto recipe, it does go hand in hand with it. They go so perfectly together on pizza, crackers, or noodles. I also want to post this tasty sundried tomato sauce here as I'm going to slowly post savory recipes from Sweetly Raw onto this new blog. It's a kicked up version of regular raw tomato sauce.


Chunky Raw Sundried Tomato Suace

1/2 cup packed sun dried tomatoes, soaked 3-6 hours
1 cup diced fresh tomato
1/2 cup diced red bell pepper
6 kalamata olives, pitted
1 small clove garlic
2 tablespoons chopped green onion
2 tablespoons packed fresh basil
1 teaspoon dried oregano
Squirt of lemon juice
1 tablespoon olive oil
Sea salt, to taste
Large handful chopped parsley

Process all ingredients except the parsley and salt, in a food processor until still a little chunky.
Stir in the fresh parsley. Season with sea salt, to taste.
Toss with spiralized zucchini noodles.

Zucchini noodles with sundried tomato sauce, pesto, and moose meatballs. A hearty "paleo meets raw" meal! 


Parsley Pesto Salad Dressing

Here's a recipe I made in the summer of 2009 as part of this post with an abundance of parsley and basil in my outdoor herb garden.


2 cups packed basil
2/3 cup packed parsley
3/4 cup olive oil
1/2 cup walnuts
2-3 large cloves garlic
2 teaspoons nutritional yeast
lemon juice or apple cider vinegar, to taste
1/2 teaspoon sea salt, or to taste

Mix all ingredients in a blender, leaving some texture, or until smooth if desired.
Use as a salad dressing or dip for crackers/veggies.


Spinach Basil Pesto

Here's a yummy pesto I made in this post in 2010 for some veggie wraps. Packed with spinach and much lower in fat than most pestos, this is great over zucchini/kelp noodles, salad, crackers, or veggie sticks. 

2 1/2 cups packed spinach
3/4 cup fresh basil leaves
1/3 cup sun dried tomatoes, chopped
3 Tablespoons hemp seeds
3 Tablespoons lemon juice
2-3 Tablespoons water
3 Tablespoons olive oil
1 Tablespoon nutritional yeast
1 large clove garlic
1/2 teaspoon Himalayan salt

In a food processor, blend all ingredients into a paste. 
Taste, adjust salt. 

For a Pesto Dip, blend some pesto with a bunch of spinach! 

What's your favorite pesto recipe?